Difference between revisions of "VMS IDE how to"
| Line 10: | Line 10: | ||
# Select '''VMS IDE''' extension | # Select '''VMS IDE''' extension | ||
# Click the '''Install''' button in the '''Extensions''' view | # Click the '''Install''' button in the '''Extensions''' view | ||
| − | [[File:Install_vms_ide.png| | + | [[File:Install_vms_ide.png|750px|none|none|Install VMS IDE]] |
VS Code will install the extension. To verify that it is installed: | VS Code will install the extension. To verify that it is installed: | ||
| Line 16: | Line 16: | ||
# Type “vms ide” to the '''Search''' bar in the '''Settings''' tab | # Type “vms ide” to the '''Search''' bar in the '''Settings''' tab | ||
The extension will be displayed in the list of settings: | The extension will be displayed in the list of settings: | ||
| − | [[File:Verify_vms_ide_is_installed.png| | + | [[File:Verify_vms_ide_is_installed.png|750px|none|none|verify vms ide is installed]] |
Revision as of 09:38, 12 April 2021
Installing Visual Studio Code
To start working with VMS IDE you need to install Visual Studio Code editor.
- Go to https://code.visualstudio.com/
- Click the download dropdown button and select the build for your platform (Windows, Mac, or Linux). The installer will be downloaded.
- Run the installer and follow the instructions
Installing VMS IDE extension
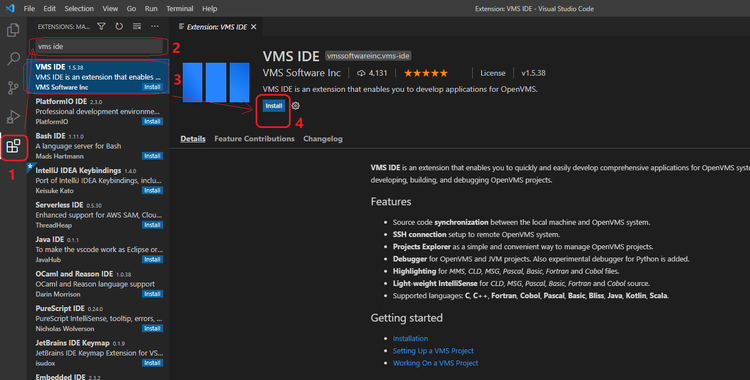
- Select Extensions view in the Activity Bar
- Type “vms ide” into the search box
- Select VMS IDE extension
- Click the Install button in the Extensions view
VS Code will install the extension. To verify that it is installed:
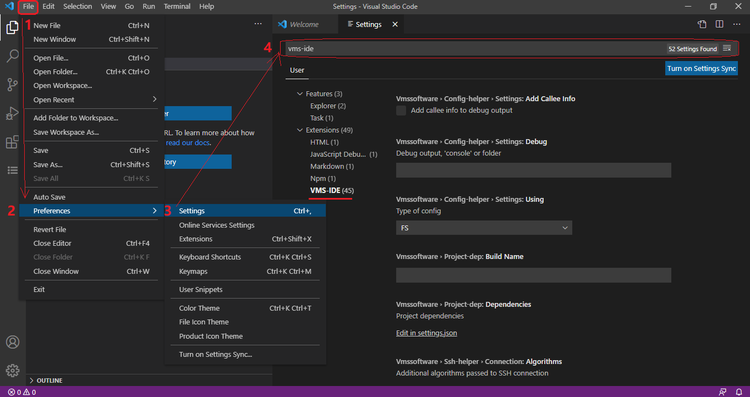
- Go to File → Preferences → Settings
- Type “vms ide” to the Search bar in the Settings tab
The extension will be displayed in the list of settings:

