Difference between revisions of "VMS IDE how to"
| Line 70: | Line 70: | ||
# Specify your project settings (see info about parameters and values below). | # Specify your project settings (see info about parameters and values below). | ||
| − | # Save file: press <Ctrl>+<S> or select File → Save | + | # Save file: press <Ctrl> + <S> or select File → Save |
The vmssoftware.synchronizer-settings.json file will be saved in the .vscode directory in the root of the project folder. | The vmssoftware.synchronizer-settings.json file will be saved in the .vscode directory in the root of the project folder. | ||
Revision as of 11:35, 12 April 2021
Contents
[hide]Installing Visual Studio Code
To start working with VMS IDE you need to install Visual Studio Code editor.
- Go to https://code.visualstudio.com/
- Click the download dropdown button and select the build for your platform (Windows, Mac, or Linux). The installer will be downloaded.
- Run the installer and follow the instructions
Installing VMS IDE extension
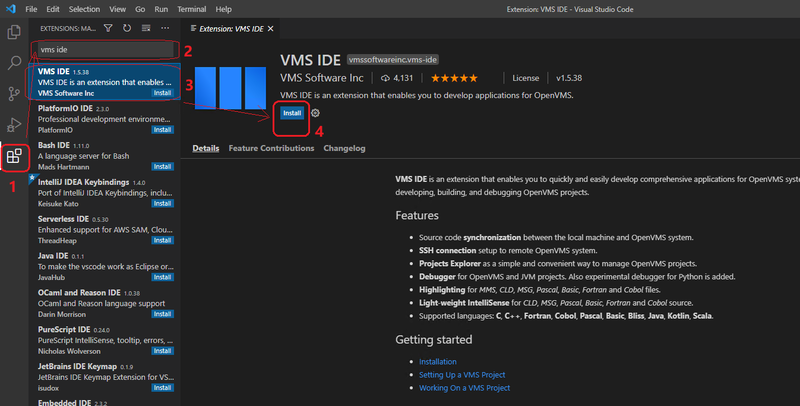
- Select Extensions view in the Activity Bar
- Type “vms ide” into the search box
- Select VMS IDE extension
- Click the Install button in the Extensions view
VS Code will install the extension. To verify that it is installed:
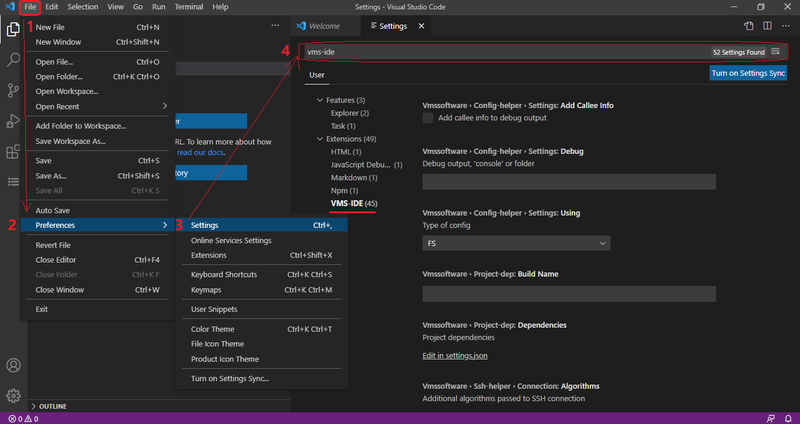
- Go to File → Preferences → Settings
- Type “vms ide” to the Search bar in the Settings tab
The extension will be displayed in the list of settings:
Creating and setting up a project
Creating a project folder
To start working on your project you need to open the folder that will be used as a project folder.
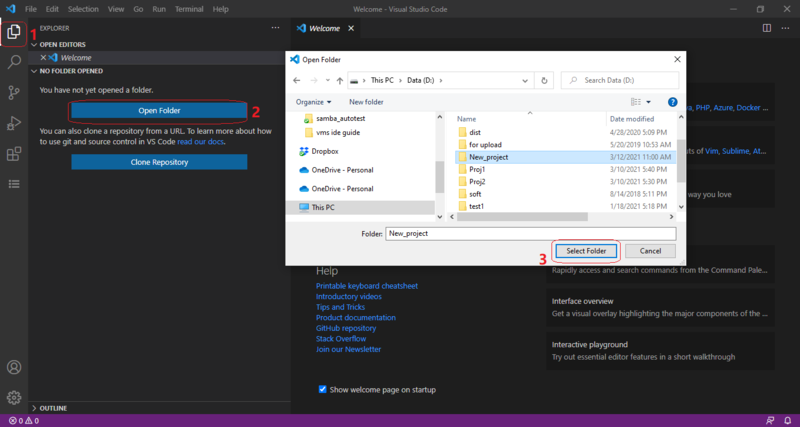
- Select the Explorer view in the Activity bar
- Click the Open Folder button
- Select a folder for the project in the dialog window and click the Select Folder button.
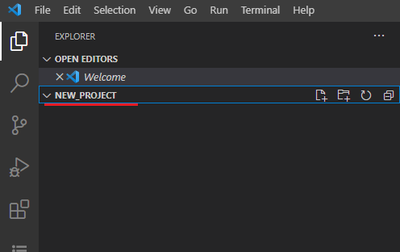
The selected folder is shown in the Explorer tab. All project files and directories will be shown in this panel.
The alternative way to open the folder: File → Open folder… → Select a folder for the project
Updating workspace settings
From the official page of VS Code:
A Visual Studio Code "workspace" is the collection of one or more folders that are opened in a VS Code window (instance). In most cases, you will have a single folder opened as the workspace but, depending on your development workflow, you can include more than one folder, using an advanced configuration called Multi-root workspaces.
Before you start working on your project you need to set up your workspace. Two important options that you need to set are
- End of Line character
- Type of configuration
End of Line Character
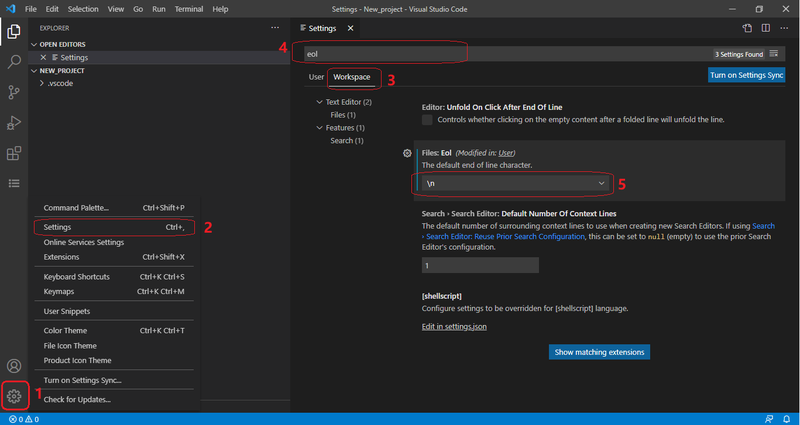
To select the end of line character:
- Click the Manage icon in the Activity bar
- Click Settings in the popup menu
- Select Workspace in the Settings tab
- Type “eol” in the search bar
- Select “\n” (LF) in the Files: EOL drop-down list
After changing EOL the .vscode directory with settings.json will be created in your project folder.
Type of configuration
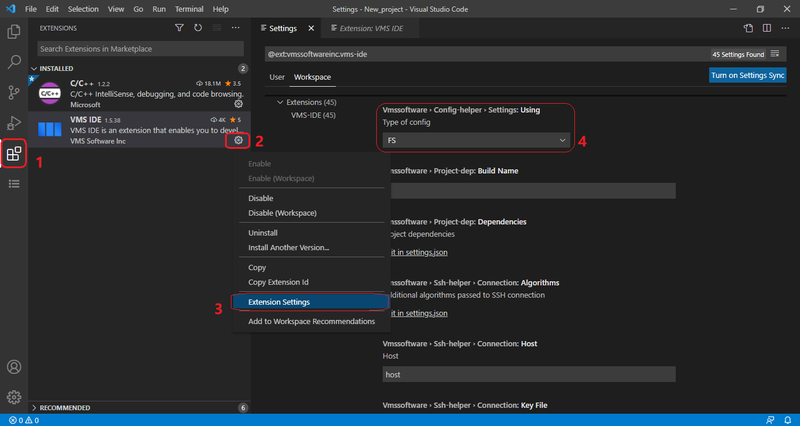
To select the type of configuration:
- Select Extensions view in the Activity bar
- Right-click the Gear icon of the VMS IDE extension
- Click the Extension Settings
- Select the Using Type item of the config from the drop-down list. We recommend using FS (default value)
All project, ssh, and other settings will be saved in JSON files in the .vscode directory of the project folder.
Updating project settings
Create a project configuration file
You need to create a file with project configuration and specify your project settings in it:
- Click the View menu option
- Select Command Palette… option from the View menu
- Type “>VMS-IDE: edit VMS project settings” in the Command Palette bar
- Select the “VMS-IDE: edit VMS project settings” command from the drop-down list
The editor opens vmssoftware.synchronizer-settings.json
- Specify your project settings (see info about parameters and values below).
- Save file: press <Ctrl> +
or select File → Save
The vmssoftware.synchronizer-settings.json file will be saved in the .vscode directory in the root of the project folder.
