# Type ''“>vms-ide: synchronize project files with VMS”'' in the '''Command Palette''' bar
# Type <code>>vms-ide: synchronize project files with VMS</code> in the '''Command Palette''' bar
# Select the ''“vms-ide synchronize project files with VMS”'' command from the drop-down list
# Select the <code>vms-ide synchronize project files with VMS</code command from the drop-down list
If you specified '''“downloadNewFiles:overwrite”''' files from a remote machine will be downloaded. Local files with the same names will be overwritten. Info about the synchronization process is shown in the panel. Downloaded files can be verified in the '''Explorer''' view of the '''Activity''' bar.
If you specified '''“downloadNewFiles:overwrite”''' files from a remote machine will be downloaded. Local files with the same names will be overwritten. Info about the synchronization process is shown in the panel. Downloaded files can be verified in the '''Explorer''' view of the '''Activity''' bar.
Click the download dropdown button and select the build for your platform (Windows, Mac, or Linux). The installer will be downloaded.
Run the installer and follow the instructions
(!) This guide uses Visual Studio Code for Windows
Installing VMS IDE extension
Select Extensions view in the Activity Bar
Type vms ide into the search box
Select VMS IDE extension
Click the Install button in the Extensions view
Install VMS IDE
VS Code will install the extension. To verify that it is installed:
Go to File → Preferences → Settings
Type vms ide to the Search bar in the Settings tab
The extension will be displayed in the list of settings:
verify vms ide is installed
Creating and setting up a project
Creating a project folder
To start working on your project you need to open the folder that will be used as a project folder.
Select the Explorer view in the Activity bar
Click the Open Folder button
Select a folder for the project in the dialog window and click the Select Folder button.
open project 2
The selected folder is shown in the Explorer tab. All project files and directories will be shown in this panel.
project is open
The alternative way to open the folder: File → Open folder… → Select a folder for the project
Updating workspace settings
From the official page of VS Code: A Visual Studio Code "workspace" is the collection of one or more folders that are opened in a VS Code window (instance). In most cases, you will have a single folder opened as the workspace but, depending on your development workflow, you can include more than one folder, using an advanced configuration called Multi-root workspaces.
Before you start working on your project you need to set up your workspace. Two important options that you need to set are
End of Line character
Type of configuration
End of Line Character
To select the end of line character:
Click the Manage icon in the Activity bar
Click Settings in the popup menu
Select Workspace in the Settings tab
Type eol in the search bar
Select “\n” (LF) in the Files: EOL drop-down list
select eol
After changing EOL the .vscode directory with settings.json will be created in your project folder.
Type of configuration
To select the type of configuration:
Select Extensions view in the Activity bar
Right-click the Gear icon of the VMS IDE extension
Click the Extension Settings
Select the Using Type item of the config from the drop-down list. We recommend using FS (default value)
Type of configuration is setting
All project, ssh, and other settings will be saved in JSON files in the .vscode directory of the project folder.
Updating project settings
Create a project configuration file
You need to create a file with project configuration and specify your project settings in it:
Click the View menu option
Select Command Palette… option from the View menu
Type >VMS-IDE: edit VMS project settings in the Command Palette bar
Select the VMS-IDE: edit VMS project settings command from the drop-down list
edit project settings 1
The editor opens vmssoftware.synchronizer-settings.json
Specify your project settings (see info about parameters and values below).
Save file: press <Ctrl>+<S> or select File → Save
The vmssoftware.synchronizer-settings.json file will be saved in the .vscode directory in the root of the project folder.
Customize project configuration
After the file is created you need to customize it specifying the parameters.
The structure of the vmssoftware.synchronizer-settings.json file consists of 3 sections:
(!) Follow the links to view all the options for each section.
Generally, in the project section you need to:
Set the root directory. For example, if the project is located in WORK:[USER.DEMOS.SIMPLE] and the home directory is WORK:[USER], set the parameter value to demos/simple or /work/user/demos/simple
Select the projectType that you need
Specify the projectName. WARN: Do not use spaces or special characters in the projectName
Check builders. These files will be synchronized.
Check headers. These files will be synchronized and included in the auto-generated MMS file as header files. Changing any of them will result in a full project rebuild.
Check source. These files will be synchronized and included in the auto-generated MMS file as source files.
Check resource. These files will be synchronized but not included in the auto-generated MMS file.
Adjust the exclude field value to list the files similar to the described above but not to be synchronized and compiled.
Check listing. These files will be downloaded after building the project. Files "*.lis,*.map" are required for the debugger.
If the project depends on already installed libraries, specify them in the addLibraries and addIncludes
Glob syntax:
* to match one or more characters in a path segment ? to match one character in a path segment ** to match any number of path segments, including none {} to group conditions (for example {**/*.html,**/*.txt} matches all HTML and text files) [] to declare a range of characters to match (example.[0-9] to match on example.0, example.1, …)
Generally, in the synchronize section you need to:
Select the downloadNewFiles value - strategy for downloading remote files that are newer than local copies.
If you have the full project on OpenVMS and want to download it to your local machine, set downloadNewFiles to overwrite.
If you have the full project on your local machine and use OpenVMS only for compiling and debugging, set downloadNewFiles to skip.
If the project on OpenVMS can be changed outside and may be newer than the local copy, set downloadNewFiles to edit.
Generally, in the build section you need to:
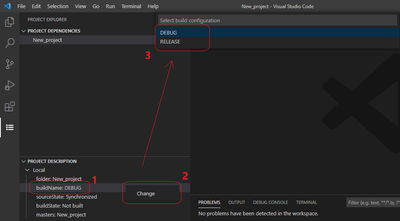
Specify label - unique name of the build configuration. Note: the label is also used as the name of the output folder.
Add a description - description of the build configuration
By default, there are two build configurations:
DEBUG, which is necessary for debugging
RELEASE, which produces binaries for your project deployment.
For custom build configurations for your project see here.
Example of vmssoftware.synchronizer-settings.json
For syncing source code files, building, running, and debugging project you need to create a file with SSH configuration and specify your SSH settings in it:
Select the View menu option
Select Command Palette… option from the View menu
Type >VMS-IDE: edit VMS ssh-helper settings in the Command Palette bar
Select the VMS-IDE: edit VMS ssh-helper settings command from the drop-down list
edit ssh settings 1
The editor opens vmssoftware.ssh-helper-settings.json
Specify your SSH settings (see info about parameters and values below).
Save file: press <Ctrl>+<S> or select File → Save
The vmssoftware.ssh-helper-settings.json file will be saved in the .vscode directory in the root of the project folder.
Customize SSH settings configuration file
After the file is created you need to specify the required parameters. The vmssoftware.ssh-helper-settings.json file consists of 4 sections:
connection - the current connection details
host-collection - a list of connections required for the project
timeouts - SSH connection timeouts
terminal - command to start the shell in the VS Code integrated terminal
Generally, in the connection section you need to specify: Required
Specify host - IP-address or name of an OpenVMS machine or the label of a predefined connection from the host collection section. In the latter case, all other fields in the connection section are ignored.
username - User account that will be used for the SSH connection.
Optional
password - User password that will be used for the SSH connection. If it is omitted, a password input box will be shown on a connection attempt.
If you need to connect to different servers when working on your project specify their settings in the host collection section. Typically the settings for every host are:
label - label for the current host's settings. It can be used as a host in the connection section
host
password or key
port
username
To use one of the connections from the host collection section, copy the label value and paste it in angle brackets (<label>) to the host field in the connection section.
Example of vmssoftware.ssh-helper-settings.json for a project with 2 hosts.
Follow the link to view all options for each section.
Working on a project
Synchronizing
Synchronizing allows you to transfer your project files between remote and local machines. Synchronization lists files on a VMS machine and your local machine starting from the root directory. The files are identified by the source, headers, builders, resource masks. Files matching masks listed in the exclude section are ignored.
To download files from a remote machine to the local
Set the value of downloadNewFiles option (see Updating project settings for details) in the vmssoftware.synchronizer-settings.json file
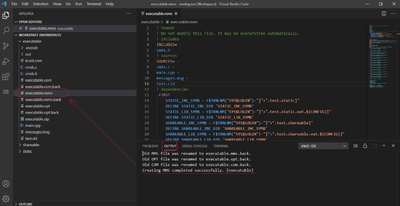
Type >vms-ide: synchronize project files with VMS in the Command Palette bar
Select the vms-ide synchronize project files with VMS</code command from the drop-down list
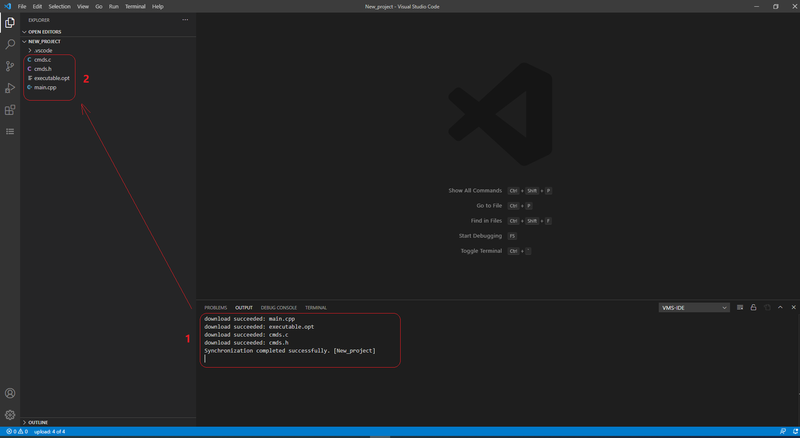
If you specified “downloadNewFiles:overwrite” files from a remote machine will be downloaded. Local files with the same names will be overwritten. Info about the synchronization process is shown in the panel. Downloaded files can be verified in the Explorer view of the Activity bar.
sync to local
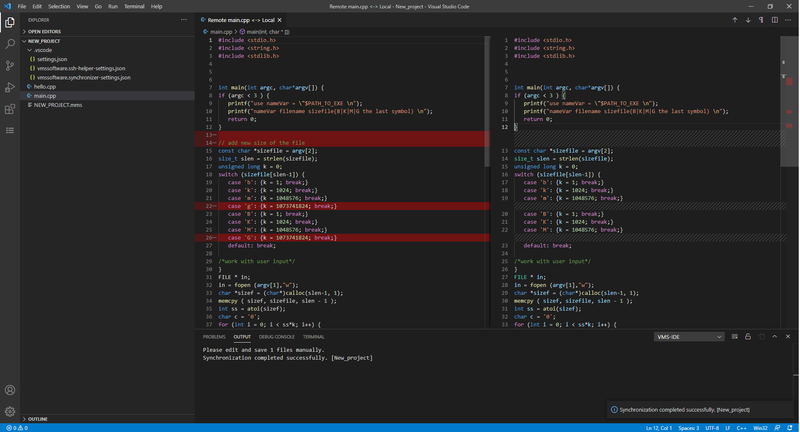
If you specified “downloadNewFiles:edit” files from a remote machine will be downloaded into memory and the edit-merge window will be opened to let you decide what changes to save. Make necessary changes on the local side and save files using keyboard shortcut<Ctrl>+<S>.
sync to local edit
To upload files from the local machine to a remote one
If you have project files only on your local machine and want to upload them to a remote machine:
Type “>vms-ide: Upload all” in the Command Palette bar
Select the “vms-ide: Upload all” command from the drop-down list
Files from your local machine will be upload to a remote one. Info about the synchronization process will be shown in the panel. Uploaded files can be verified on the remote side:
Type “>vms-ide: Terminal” in the Command Palette bar
Select the “vms-ide: Terminal” command from the drop-down list
Move to the root project directory in the command prompt of the Terminal tab in the panel.
Use the “dir” command to show uploaded files.
upload files
If you have files on both sides use the vms-ide: synchronize project files with VMS command (see the description below).
Managing dependencies
From the official documentation of VS Code:

When building a solution that contains multiple projects, it can be necessary to build certain projects first, to generate code used by other projects. When a project consumes executable code generated by another project, the project that generates the code is referred to as a project dependency of the project that consumes the code.
Such dependency relationships can be defined in the Project Dependencies dialog box.

Project types:
executable - source files will be built and linked in the executable image
library - object library (OLB) will be created
shareable - extension will create a shareable image
Adding all projects to the workspace:
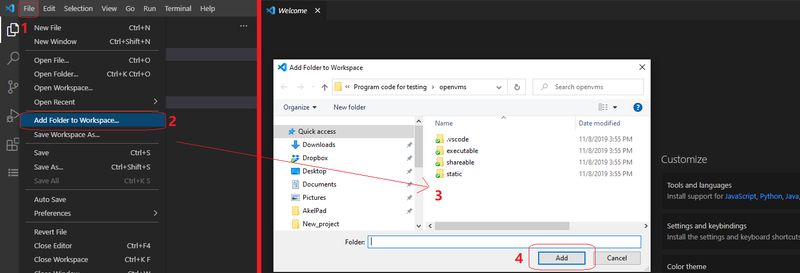
Click the File menu option
Click Add folder to workspace…
Select the folder of the project in the dialog window
Click the Add button
add folder to workspace
The selected folder is shown in the Explorer view.
Saving the workspace
For quick access to the workspace with multiple projects save the workspace as a file:
Select File menu option
Select Save workspace as…
Type the file name
Click the Save button
After the workspace is saved you can access it by File → Open workspace…
Managing dependencies
Select the Project Explorer view in the Activity bar
Select the main project in the Project Explorer panel
Right-click the project that you want to add as a dependency to the main project
Click Add to dependencies of selected from the menu
manage dep
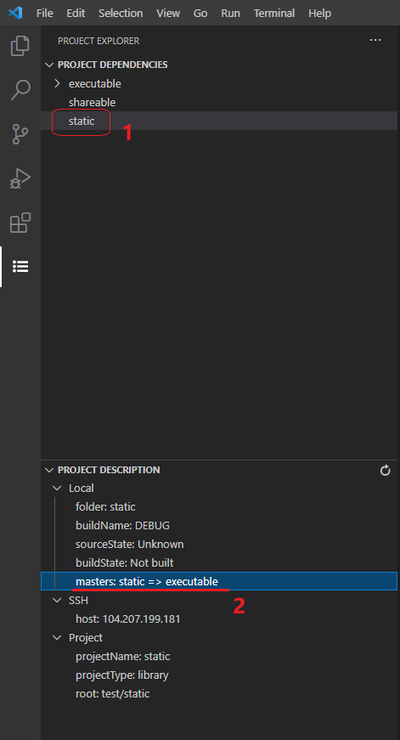
To verify the created dependency:
Select the project added to the dependencies in the Project Explorer panel
The Project description section will contain the master parameter showing the dependency
Type “>vms-ide: Terminal” in the Command Palette bar
Select the “vms-ide: Terminal” command from the drop-down list
Go to the root project directory in the command prompt of the Terminal tab in the panel.
Go to [.outdir.buildname]
where:
outdir - the value of the outdir option in the Project section.
buildname - the value of the  label in the builds section
(you can check it in vmssoftware.synchronizer-settings.json)
Use the ‘dir’ command to see the contents of the selected directory.
For a project with dependencies select the master project on the 2nd step. Then in the command palette select the command: vms-ide build on VMS.
Debugging a project
Preparing for debugging
The project should be built with the DEBUG  build type.
Create a debug configuration file
Execute command “prepare to debug”
To create a debug configuration:
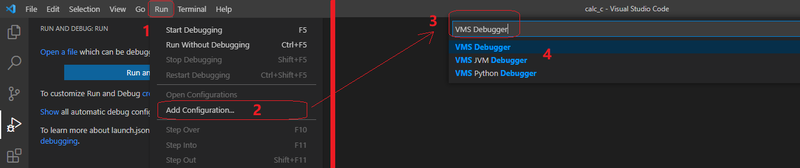
Go to Run → Add Configuration…
Type “VMS debugger” in the search bar
Select the required option for your project debugger:
If you work on a Java, Kotlin, or Scala project, select the VMS JVM Debugger. To learn more about working with these types of projects, see VMS IDE for Java.
If you work on a Python project, select the VMS Python Debugger
If you work on other project types, select the VMS debugger
create debug conf
The launch.json file will be opened in the editor.
Customize debug settings and (or) save changes: press <Ctrl>+<S>. The launch.json file will be saved to the  .vscode directory in the root of the project folder.
After the build, files described by the listing mask will be loaded from the outdir/buildname directory on VMS into the outdir/buildname directory of your local machine with the "Prepare to debug" command from the "PROJECT EXPLORER" menu for the selected project.

Therefore, if you use your own build script, you should make sure that LISTING files are in the root/outdir/buildname directory after the build.

Also, the "Prepare to debug" command creates a JSON file in the .vscode directory with the matching of the module names and the source files; you can edit that file if you wish but please note that it will be overwritten after the command is issued next time.


To execute the “Prepare to debug” command :
Invoke the “Command Palette”: press <Ctrl>+<Shift>+<P>
Type “>vms-ide prepare to debug” in the Command Palette bar:
Select the “vms-ide prepare to debug” command from the drop-down list
The result of the process will be shown in the Output tab of the panel. The debug_info.json will be created in the .vscode directory at the root of the project folder.
Running debugger
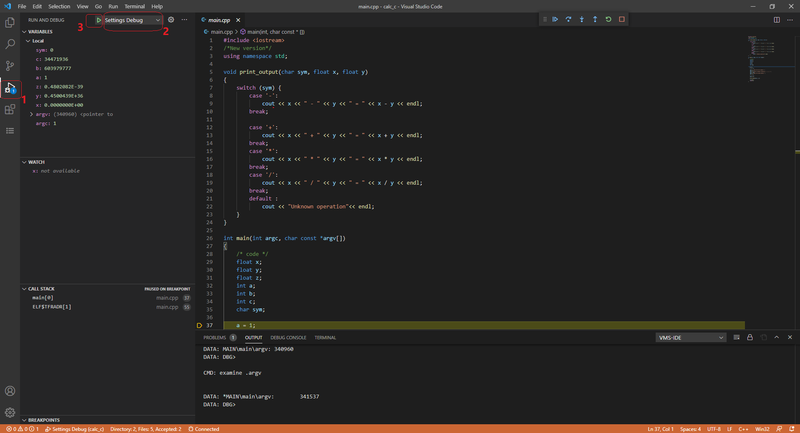
Select the Run view in the Activity bar
Select Debug configuration from the Run and Debug drop-down list
Click the Start debugging icon (green triangle)
If you did not fill the program parameter in the launch configuration, the extension tries to run the file projectName.com from project root folder to set up required logical names. Then it runs the debugger and passes the [.outdir.buildname]projectName.exe file to it.
In other case the program parameter must be the full OpenVMS path to the debugging image. The extension just runs the debugger and passes the value of program to it.
run debugger
The connection to a remote machine will be established. Info about debugging session will be displayed in the Debug console tab.