VMS IDE Project Configuration: Difference between revisions
Created page with "=Workspace= When starting working with VMS IDE, you need to configure your workspace and select the type of configuration that will be used for the project. ===Project folder..." |
No edit summary |
||
| Line 1: | Line 1: | ||
=Workspace= | =Workspace= | ||
When starting working with VMS IDE, you need to configure your workspace and select the type of configuration that will be used | When starting working with VMS IDE, you need to configure your workspace and specify the project folder and select the type of configuration that will be used. | ||
==Project folder== | |||
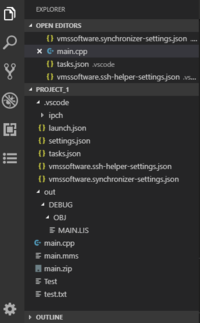
Use '''Explorer''' view to manage source code, resources, and settings files of your projects. | |||
{| style="border-style: none;" | |||
|- | |||
|rowspan="2"| [[File:Vms ide explorer.png|200px|thumb|none|VMS IDE Explorer]] | |||
|style="vertical-align:top; padding-left: 20px;" | Project folder will store project settings and source files. To add a project folder | |||
# Create a folder on your machine. | # Create a folder on your machine. | ||
# In Visual Studio Code, click the ''Explorer'' icon (<code>Ctrl+Shift+E</code>) in the Activity Bar | # In Visual Studio Code, click the ''Explorer'' icon (<code>Ctrl+Shift+E</code>) in the Activity Bar | ||
# Click ''Open Folder'' and select the previously created folder. | # Click ''Open Folder'' and select the previously created folder. | ||
<br> | |||
If you are working on a complex project with dependencies, you will likely need to add other projects to the current workspace.<br> | |||
For this, just add another project folder as shown below. | |||
# Create another folder that will store files of the second project | |||
# In Visual Studio Code, select ''File > Add folder to workspace'' and select the folder you created. | |||
|} | |||
==End of line== | |||
Specify the End of Line character that will be used across all source files. You must use <code>LF</code>. | |||
# Open Visual Studio Code settings (<code>Ctrl+,</code>) | # Open Visual Studio Code settings (<code>Ctrl+,</code>) | ||
# Navigate to Text Editor > Files > Eol (The default end of line character) and set it to ''\n'' (LF). | # Navigate to Text Editor > Files > Eol (The default end of line character) and set it to ''\n'' (LF). | ||
==Type of configuration== | |||
Select type of configuration for your project. Recommended type is '''FS'''. | |||
# Open Visual Studio Code settings (<code>Ctrl+,</code>) | # Open Visual Studio Code settings (<code>Ctrl+,</code>) | ||
# Navigate to Extensions > VMS-IDE > Config-helper › Settings: Using, and select one of the options. | # Navigate to Extensions > VMS-IDE > Config-helper › Settings: Using, and select one of the options. | ||
| Line 18: | Line 31: | ||
#* '''VCS''' - manage settings using VS Code provided API. | #* '''VCS''' - manage settings using VS Code provided API. | ||
# Press <code>F1</code> and run "Reload window" command or close Visual Studio Code and open it again. | # Press <code>F1</code> and run "Reload window" command or close Visual Studio Code and open it again. | ||
{| style="border-style: none;" | |||
! FS and VFS | |||
! VCS | |||
|- | |||
|style="padding-right: 20px;" | [[File:Syncronizer-settings-fs.png|600px|none|thumb|]] | |||
|style="padding-left: 20px;" | [[File:Syncronizer-settings-vsc.png|600px|thumb|none|]] | |||
|- | |||
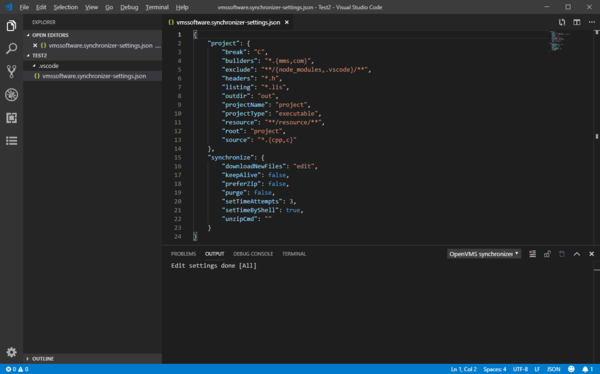
|style="padding-right: 20px; text-align: center" | Settings are stored in a JSON file that can be easily modified in the editor. | |||
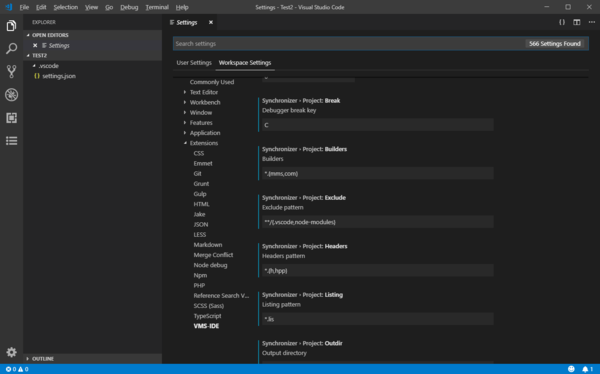
|style="padding-left: 20px; text-align: center" | Settings can be adjusted using Visual Studio Code settings page. | |||
|} | |||
'''NOTE''': Changing the type of configuration does not copy existing settings from one location to another. | '''NOTE''': Changing the type of configuration does not copy existing settings from one location to another. | ||
=SSH Configuration= | |||
The SSH connection to an OpenVMS machine is required for syncing source files, building and debugging projects. There are two ways of accessing SSH connection settings. | |||
; Command : Press <code>F1</code> and run <code>VMS-IDE: Edit ssh-helper settings</code> command. | |||
; Project Explorer : | |||
:# Open [[VMS_IDE_Project_Explorer|'''Project Explorer''']] | |||
:# Select your project from the list | |||
:# In the '''PROJECT DESCRIPTION''' section, right-click '''SSH > host''' and select Edit. | |||
==SSH Settings description== | |||
See [[VMS_IDE_SSH_Configuration|SSH settings]] for more details on particular settings. | |||
=Project Configuration= | =Project Configuration= | ||
| Line 25: | Line 62: | ||
==Adjusting Settings== | ==Adjusting Settings== | ||
The configuration procedure varies depending on the selected type of configuration. | The project configuration procedure varies depending on the selected type of configuration. | ||
; FS or VFS : The Edit command loads current settings from memory and saves it to '''vmssoftware.synchronizer-settings.json''' file, then opens the file for editing. | |||
; VCS : The Edit command opens Workspace settings. Navigate to '''Synchronizer''' section and adjust the settings. | |||
==Settings description== | ==Settings description== | ||
| Line 39: | Line 71: | ||
* [[Project_Configuration|Project]] - general project settings | * [[Project_Configuration|Project]] - general project settings | ||
* [[Synchronize_Configuration|Synchronize]] - synchronizer specific settings | * [[Synchronize_Configuration|Synchronize]] - synchronizer specific settings | ||
Revision as of 12:03, 29 March 2019
Workspace
When starting working with VMS IDE, you need to configure your workspace and specify the project folder and select the type of configuration that will be used.
Project folder
Use Explorer view to manage source code, resources, and settings files of your projects.
End of line
Specify the End of Line character that will be used across all source files. You must use LF.
- Open Visual Studio Code settings (
Ctrl+,) - Navigate to Text Editor > Files > Eol (The default end of line character) and set it to \n (LF).
Type of configuration
Select type of configuration for your project. Recommended type is FS.
- Open Visual Studio Code settings (
Ctrl+,) - Navigate to Extensions > VMS-IDE > Config-helper › Settings: Using, and select one of the options.
- FS - save settings in local JSON files.
- VFS - save setting in VS Code virtual file system.
- VCS - manage settings using VS Code provided API.
- Press
F1and run "Reload window" command or close Visual Studio Code and open it again.
| FS and VFS | VCS |
|---|---|
 |
 |
| Settings are stored in a JSON file that can be easily modified in the editor. | Settings can be adjusted using Visual Studio Code settings page. |
NOTE: Changing the type of configuration does not copy existing settings from one location to another.
SSH Configuration
The SSH connection to an OpenVMS machine is required for syncing source files, building and debugging projects. There are two ways of accessing SSH connection settings.
- Command
- Press
F1and runVMS-IDE: Edit ssh-helper settingscommand.
- Project Explorer
-
- Open Project Explorer
- Select your project from the list
- In the PROJECT DESCRIPTION section, right-click SSH > host and select Edit.
SSH Settings description
See SSH settings for more details on particular settings.
Project Configuration
To open the project settings, press F1 and run VMS-IDE: Edit OpenVMS project settings command or use Project Explorer view.
Adjusting Settings
The project configuration procedure varies depending on the selected type of configuration.
- FS or VFS
- The Edit command loads current settings from memory and saves it to vmssoftware.synchronizer-settings.json file, then opens the file for editing.
- VCS
- The Edit command opens Workspace settings. Navigate to Synchronizer section and adjust the settings.
Settings description
The settings are split into two sections:
- Project - general project settings
- Synchronize - synchronizer specific settings
